This tutorial assumes you already have a basic understanding of gemstone faceting.
Hackagem uses JavaScript to run the code and create the faceting designs. This might sound intimidating for non-programmers and even for programmers 😉, but in practice, it functions here more like a specification language than a traditional programming language. Initially, we experimented with developing a new specification language specifically for faceting designs, but we realized it wasn’t a good idea.
Another key feature is the Meetpoint system. There’s no need for guessing or trial and error — each meetpoint is clearly labeled: the labels are concise and uniquely identify the meetpoints.
We’ll go throught this and all the steps to cut a round brilliant variant to show the basic capabilities and specifics of Hackagem.
| Top View | Bottom View |
|---|---|

|

|
Pavilion
| Tier | Angle | Index | Instructions |
|---|---|---|---|
| 1 | 42.50° | 03-13-19-29-35-45-51-61-67-77-83-93 | Cut to centerpoint |
| 2 | 90.00° | 03-13-19-29-35-45-51-61-67-77-83-93 | Set stone size |
| 3 | 41.22° | 00-16-32-48-64-80 |
Crown
| Tier | Angle | Index | Instructions |
|---|---|---|---|
| A | 47.00° | 03-13-19-29-35-45-51-61-67-77-83-93 | Set girdle size |
| B | 38.00° | 00-16-32-48-64-80 | Meet 2 |
| C | 20.00° | 03-13-19-29-35-45-51-61-67-77-83-93 | Meet A |
| D | 0.00° | 00 | Meet B |
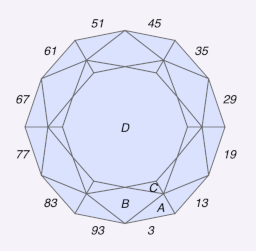
The diagram above represents our target design. From the picture, we can gather several clues: it uses a 96-index gear, and the six-pointed star indicates six-fold symmetry. Additionally, the symmetry is mirrored, as seen in tiers A and C. Tier 1 is cut to the center at a 42.5-degree angle, which is where we should start our cut. So we can write:
setSym(6, true)
cut("1", index(3), 42.5, centerPoint())
The setSym() function sets the symmetry. When set to true, it indicates mirrored symmetry. The cut command takes four parameters: 1) the tier name, 2) the indices to cut, 3) the angle, and 4) a point to cut through. The indices and the point need further explanation.
The index() function generates a list of indices based on the starting index and the applied symmetry. Since 96 divided by 6 equals 16, we cut at all indices following the pattern (3 + n * 16). This results in the indices [3, 19, 35, 51, 67, 83]. Due to the mirrored design, the final indices also include (n * 16 - 3).
The centerPoint() function returns a point above or below the center of the stone, depending on whether we are currently working on the pavilion or the crown. We now add the second cut:
setSym(6, true)
cut("1", index(3), 42.5, centerPoint())
cut("2", index(3), 90, setSize())
The new element here is the setSize() function. This function is special because it effectively returns a point based on the index at which we cut, maintaining a distance of 1 unit from the center of the stone. The result:

With the width set and one angled tier, the following cuts can use references to existing points on the stone. The function to help with this is meet().
In its simplest form, the meet function requires one parameter: the meetpoint notation. The precise details of this will be covered in a later section. For now, we’ll use the “design view” window to obtain the computer-generated labels.

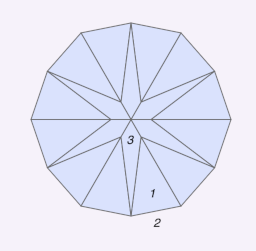
In the picture above, the three types of meet points are labeled. From the diagram at the beginning of the tutorial, we know that Tier 3 should intersect meet point “1,2” at an angle of 41.22 degrees.
setSym(6, true)
cut("1", index(3), 42.5, centerPoint())
cut("2", index(3), 90, setSize())
cut("3", index(0), 41.22, meet("1,2"))
Alright, the pavilion is finished. Let’s move on to the crown.
The crown() command in Hackagem directs that all following cut commands should be applied to the crown. It also impacts the labeling of meetpoints. The current challenge is how to cut the crown and add a girdle. The solution is to “add” something to meetpoint “3”. This is straightforward because the meet() function returns a point in 3D space, allowing us to perform various operations on it. One such operation is add(), which we’ll use with a predefined constant, girdle like this:
setSym(6, true)
cut("1", index(3), 42.5, centerPoint())
cut("2", index(3), 90, setSize())
cut("3", index(0), 41.22, meet("1,2"))

crown()
cut("A", index(3), 47, meet("3").add(girdle))
Nothing really new with the other tiers, so we extend our code to get:
|
|

And there you have it, a brilliant cut in 9 lines of JavaScript. How awesome is that?
Oh wait, you think a symmetry of 12 would have been better? Just change the setSym(6, true) to setSym(12, true) and check out the results.